Kubernetes on Proxmox: Creating a Base VM Template
Setting up a reusable Linux VM template in Proxmox to power Kubernetes control plane and worker nodes.
📚 Part of: Kubernetes Homelab
Overview
With Proxmox in place and networking sorted, the next step is building the foundation for Kubernetes itself.
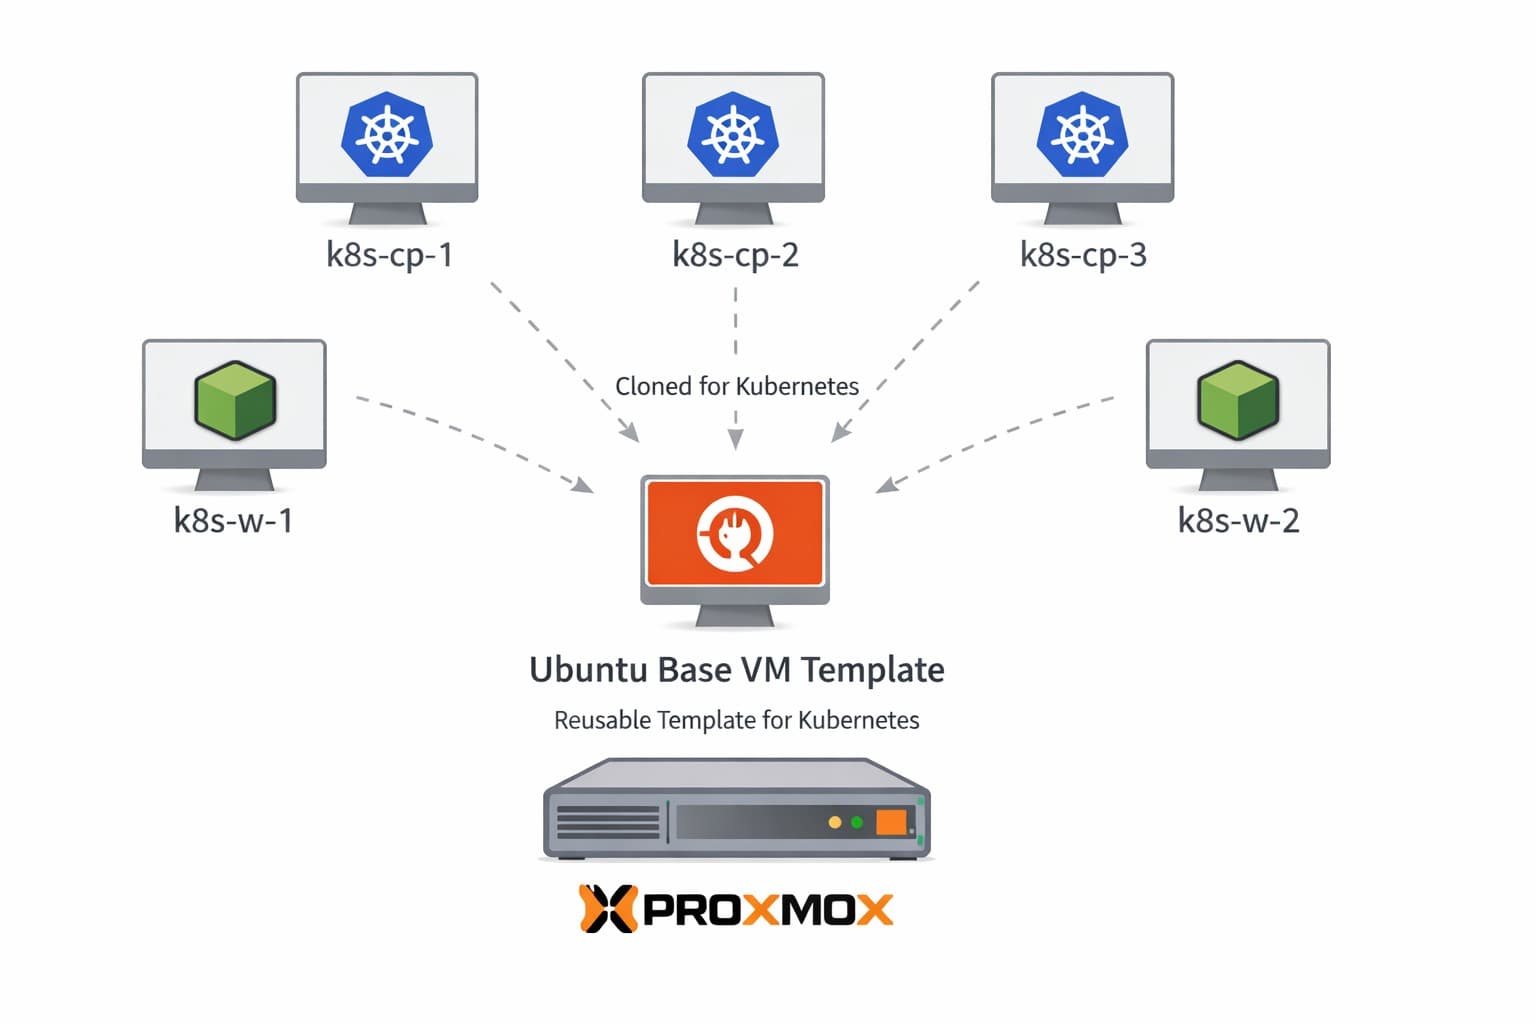
Rather than manually configuring each control plane and worker node from scratch, I start by creating a single, reusable base VM template. This template becomes the source for every Kubernetes node in the cluster, ensuring consistency and making future scaling trivial.
In this post, we’ll focus on:
- Choosing a base OS
- Creating a Proxmox VM
- Preparing the OS for Kubernetes
- Converting the VM into a reusable template
Later posts will build on this template to form the full Kubernetes cluster.
Why Use a VM Template?
Using a base template gives us several advantages:
- Consistency across all Kubernetes nodes
- Fast provisioning of new control plane or worker nodes
- Easier debugging when all nodes start from the same baseline
- Repeatability when rebuilding the cluster
This also aligns well with how Kubernetes itself expects nodes to behave: cattle, not pets.
Base OS Selection
For this cluster, I’m using:
- Ubuntu Server 22.04 LTS
- Cloud-image compatible
- Widely supported by Kubernetes tooling
Ubuntu provides a good balance of stability, documentation, and compatibility with tools like kubeadm, containerd, and popular CNI plugins.
Validating the ZFS Pool Name (rpool)
In this setup, the ZFS pool is named rpool, which is the default pool name used by Proxmox when ZFS is selected during installation.
However, your pool name may be different depending on how Proxmox was installed or how storage was customized. Before creating any datasets, it’s important to confirm the correct pool name on your system.
How to Check Your ZFS Pool Name
From any Proxmox node shell, run:
zpool list
You should see output similar to:
NAME    SIZE   ALLOC   FREE
rpool   1.8T   320G    1.5T
The value under the NAME column is your ZFS pool name.
If your pool is named something else (for example tank, local-zfs, or proxmox), substitute that name in all ZFS commands throughout this post.
Example: Adjusting the Dataset Command
If your ZFS pool is named tank, the dataset creation command would look like this:
zfs create tank/iso-templates
And the dataset would be mounted at:
/tank/iso-templates
That mount path is what you will use later when adding the Directory datastore in Proxmox.
Most Proxmox ZFS installs use rpool by default, but you should always confirm the pool name before creating datasets.
Proxmox Storage: ISO & Template Datastore
Before creating the base VM, it’s worth setting up a dedicated datastore for ISOs and VM templates.
ISO images are file-based, which means they cannot be stored directly on Proxmox ZFS block storage. Instead, we create a ZFS dataset and then expose it to Proxmox as Directory storage.
Depending on your Proxmox version, ZFS dataset creation may not be available in the web UI and must be done once via the CLI.
Create the ZFS Dataset
On any Proxmox node, create a dedicated dataset for ISOs and templates:
zfs create rpool/iso-templates
zfs set atime=off rpool/iso-templates
This creates a dataset mounted at:
/rpool/iso-templates
Add the Dataset as Directory Storage (Shared)
From the Proxmox UI:
- Navigate to Datacenter → Storage
- Click Add → Directory
- Configure the datastore:
- ID:
local-iso - Directory:
/rpool/iso-templates - Content:
- ☑ ISO Image
- ☑ Container template
- Shared: ☑ Enabled
- Disable:
- ⛔ Disk image
- ID:
- Click Add
Marking the datastore as shared allows all Proxmox nodes to access the same ISO images and templates without duplication.
How This Datastore Is Used
This datastore is used for:
- Ubuntu Server ISO images
- Container templates
- Base VM templates
Running Kubernetes VM disks live on separate ZFS-backed storage optimized for runtime workloads.
You should end up with a setup similar to the following:
Creating the Base VM in Proxmox
Download Ubuntu Server ISO
Before creating the VM, you need to download the Ubuntu Server 22.04 LTS ISO and upload it to Proxmox.
Steps:
-
Download the ISO
- Visit the Ubuntu Server download page
- Download Ubuntu Server 22.04.x LTS
-
Upload to Proxmox
- Navigate to your Proxmox node in the web UI
- Click on the iso-templates datastore we created earlier
- Click Upload in the toolbar
- Select the Ubuntu Server ISO file you downloaded
- Wait for the upload to complete
Once uploaded, the ISO will be available when creating the VM in the next step.
Create the VM
Create a new VM in Proxmox with the following baseline specs:
- CPU: 2 vCPUs
- Memory: 4 GB RAM
- Disk: 40–60 GB
- Network: Attached to the Kubernetes VLAN (
vmbr30) - Boot: UEFI (recommended)
- ISO Image: Select the Ubuntu Server 22.04 ISO you just uploaded
Now we should have our new VM to work off of:
Installing Ubuntu Server
Now that the VM is created, we need to install Ubuntu Server on it.
Start the VM and Open Console
-
Start the VM
- Right-click on the VM in the Proxmox UI
- Select Start
-
Open the Console
- Right-click on the VM again
- Select Console
- This will open a VNC console showing the VM's display
The VM will boot from the Ubuntu Server ISO you attached during VM creation.
Ubuntu Installation Process
The Ubuntu Server installer will guide you through the installation:
-
Language Selection
- Choose your preferred language (typically English)
-
Keyboard Configuration
- Select your keyboard layout
-
Installation Type
- Choose Ubuntu Server (not Ubuntu Server (minimized))
-
Network Configuration
- The installer should auto-detect the network interface on
vmbr30 - Verify it receives an IP address via DHCP on the 192.168.30.x subnet
- If not, check your UniFi switch port configuration
- The installer should auto-detect the network interface on
-
Proxy Configuration
- Leave blank unless you're using a proxy (most homelabs won't need this)
-
Mirror Configuration
- Accept the default Ubuntu archive mirror
-
Storage Configuration
- Select Use an entire disk
- Choose the virtual disk you created (40-60 GB)
- Accept the default LVM configuration
- Important: Review the storage summary before confirming
-
Profile Setup
- Enter your name
- Server name: Use something descriptive like
k8s-template - Username: Create a user (e.g.,
k8sadmin) - Password: Set a strong password
-
SSH Setup
- ☑ Install OpenSSH server (recommended)
- You can optionally import SSH keys from GitHub/Launchpad
-
Featured Server Snaps
- Skip all additional packages for now
- We'll install only what we need manually
-
Installation Progress
- Wait for the installation to complete
- This typically takes 5-10 minutes
Remove the ISO Before Rebooting
Before rebooting the VM, you need to detach the installation ISO to prevent the VM from booting back into the installer.
Steps:
-
From the Proxmox UI:
- Select your VM
- Go to Hardware
- Select the CD/DVD Drive
- Click Edit
- Change to Do not use any media
- Click OK
-
Return to Console and Complete Reboot:
- Go back to the VM console
- Select Reboot Now in the Ubuntu installer
- Press Enter when prompted
If you don't remove the ISO before rebooting, the VM will boot back into the Ubuntu installer instead of your newly installed system.
After the reboot with the ISO removed, you'll see the Ubuntu login prompt.
At this stage, this VM is not a Kubernetes node — it's simply a clean Linux system we'll prepare for Kubernetes use.
Initial OS Setup
Once the VM has been installed and rebooted, log in (using the username and pw setup during install) and perform some basic OS setup:
- Update system packages
- Configure timezone and locale
- Verify user has sudo access
- Test SSH access
Login to the VM
Use the username and password you created during installation:
Update System Packages
sudo apt update && sudo apt upgrade -y
Configure Timezone
sudo timedatectl set-timezone America/New_York
Verify SSH Access
Since you installed OpenSSH server during the Ubuntu installation, SSH should already be running. Verify it's active:
sudo systemctl status ssh
SSH Access Configuration
To simplify initial access to newly cloned Kubernetes nodes, SSH password authentication is enabled in the base VM template (if you configured it).
By default, Ubuntu disables password-based SSH logins. While this is a sensible security default, enabling password authentication during the bootstrap phase makes it easier to validate connectivity and perform early cluster setup before transitioning to key-based access.
Enabling Password Authentication
Inside the base VM:
sudo sed -i 's/^#\?PasswordAuthentication.*/PasswordAuthentication yes/' /etc/ssh/sshd_config
sudo sed -i 's/^#\?UsePAM.*/UsePAM yes/' /etc/ssh/sshd_config
sudo systemctl restart ssh
You should now be able to SSH into the VM from your workstation using the user account you created during installation.
The command ip a should give you the vm's IP address.
Proxmox Guest Agent
To improve VM visibility and lifecycle management, the Proxmox QEMU Guest Agent is installed directly in the base VM template.
Installing the guest agent at the template level ensures that all cloned Kubernetes control plane and worker nodes inherit it automatically, without any per-node configuration.
Installing the Guest Agent
Inside the base VM:
sudo apt update
sudo apt install -y qemu-guest-agent
sudo systemctl start qemu-guest-agent
Preparing the OS for Kubernetes
Before Kubernetes can run reliably, the OS needs some tuning.
Disable Swap
sudo swapoff -a
sudo sed -i '/ swap / s/^/#/' /etc/fstab
Enable Required Kernel Modules
cat <<EOF | sudo tee /etc/modules-load.d/k8s.conf
overlay
br_netfilter
EOF

sudo modprobe overlay
sudo modprobe br_netfilter
Configure Kernel Parameters
cat <<EOF | sudo tee /etc/sysctl.d/k8s.conf
net.bridge.bridge-nf-call-iptables  = 1
net.bridge.bridge-nf-call-ip6tables = 1
net.ipv4.ip_forward                 = 1
EOF

sudo sysctl --system
Installing the Container Runtime
For this cluster, I’m using containerd, which is the current recommended default.
sudo apt install -y containerd
sudo mkdir -p /etc/containerd
containerd config default | sudo tee /etc/containerd/config.toml
sudo systemctl restart containerd
sudo systemctl enable containerd
Final Cleanup Before Templating
Before converting this VM into a reusable template we have a few things to do.
Clearing the Machine ID Before Templating
When cloning Ubuntu VMs from a Proxmox template, all clones may receive the same IP address, even if their MAC addresses are unique.
This happens because Ubuntu uses the system machine ID as part of its identity when requesting a DHCP lease. If the machine ID exists in the template, every cloned VM will inherit it and appear identical to the DHCP server.
To avoid this issue, the machine ID must be cleared before converting the VM into a template.
Inside the base VM:
sudo rm -f /etc/ssh/ssh_host_*
sudo rm -f /etc/machine-id
sudo truncate -s 0 /etc/machine-id
sudo rm -f /var/lib/dbus/machine-id
sudo ln -sf /etc/machine-id /var/lib/dbus/machine-id
sudo shutdown now
Convert the VM to a Template
From the Proxmox UI:
- Select the VM
- Right-click → Convert to Template
This template will be used as the starting point for all Kubernetes nodes.
What’s Next
In the next post, we’ll clone this template into multiple VMs and prepare them to become Kubernetes nodes.
➡️ Next: Kubernetes on Proxmox – Provisioning Control Plane and Worker Nodes
Real-World Platform Engineering in Your Inbox
One email a week. Deep dives on Kubernetes, homelab builds, platform tooling, and building in public from someone who does this for a living.
No fluff, no sponsored blasts. Unsubscribe any time.
Reach Engineers Who Build Platforms
My readers are Staff Engineers, Platform Engineers, and DevOps/SRE leads — the people who evaluate, buy, and recommend infrastructure tooling at their companies.
- → Sponsored posts, newsletter placements, and resource page features available
- → Audience: platform engineering, Kubernetes, GitOps, and homelab builders
- → Formats tailored to technical audiences — no generic ad copy
📚 Part of: Kubernetes Homelab
Related Posts
Kubernetes on Proxmox: Provisioning Control Plane and Worker Nodes
Cloning a Proxmox VM template into Kubernetes control plane and worker nodes and preparing them for cluster bootstrap.
Kubernetes on Proxmox: GitOps Automation with ArgoCD
Implement GitOps workflows for automated, declarative deployments using ArgoCD - manage your entire homelab from Git
Kubernetes on Proxmox: Secure Your Apps with HTTPS and cert-manager
Add automatic HTTPS with Let's Encrypt certificates using cert-manager, securing your Kubernetes applications with trusted SSL/TLS.