Kubernetes on Proxmox: Deploying Your First Real Application
Deploy a complete stateful application using persistent storage, ingress routing, and DNS in your homelab Kubernetes cluster.
📚 Part of: Kubernetes Homelab
Overview
At this point, the cluster has all the essential building blocks:
- Networking (Calico)
- Storage (Longhorn)
- Ingress (Traefik + Gateway API)
- LoadBalancers (MetalLB)
- DNS (local DNS resolution)
Now it's time to deploy a real application that ties everything together.
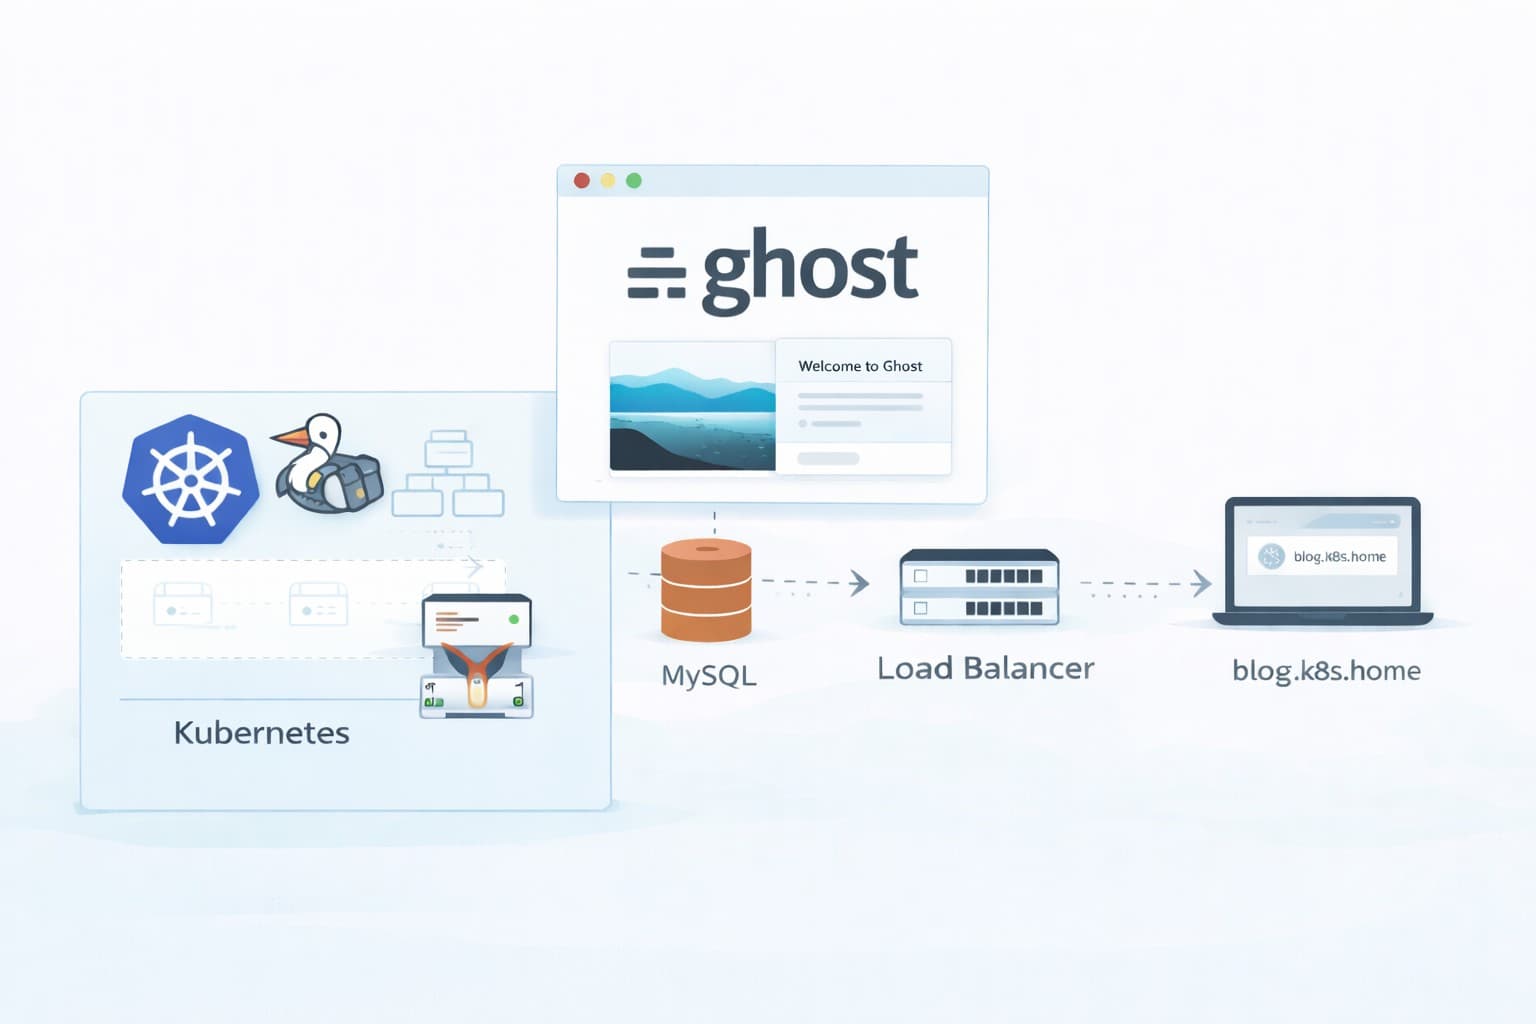
In this post, we'll deploy Ghost, a popular blogging platform, which demonstrates:
- Persistent storage for both application data and database
- Multi-container deployments (Ghost + MySQL)
- Gateway API routing
- DNS-based access
- ConfigMaps for configuration
By the end, you'll have a fully functional Ghost blog accessible at http://blog.k8s.home.
Why Ghost?
Ghost is a great first real-world application because:
- It requires a database (MySQL/MariaDB)
- It needs persistent storage for content and uploads
- It's a recognizable, production-ready application
- It demonstrates common deployment patterns
- It's lightweight enough for a homelab
You can easily adapt these patterns for other applications like WordPress, Nextcloud, or custom apps.
Architecture Overview
Our deployment will consist of:
-
MySQL Database
- StatefulSet for stable identity
- PVC for database files (via Longhorn)
- Service for internal cluster access
-
Ghost Application
- Deployment for the web application
- PVC for content and uploads
- ConfigMap for configuration
- Service for pod access
-
Gateway API HTTPRoute
- Routes
blog.k8s.hometo Ghost service - Uses Traefik LoadBalancer
- Routes
-
DNS Record
- Points
blog.k8s.hometo Traefik IP
- Points
Set Up kubectl on Your Local Machine
Up until now, we've been SSH'ing into the control plane node to run kubectl commands. While this works, it's more convenient to manage the cluster from your local workstation.
For the rest of the blog post you can continue to just ssh into the control plane node and run commands or use the below information to setup kubectl on your actual machine.
Install kubectl
Linux:
# Download the latest stable release
curl -LO "https://dl.k8s.io/release/$(curl -L -s https://dl.k8s.io/release/stable.txt)/bin/linux/amd64/kubectl"

# Make it executable
chmod +x kubectl

# Move to PATH
sudo mv kubectl /usr/local/bin/

# Verify installation
kubectl version --client
macOS:
# Using Homebrew (recommended)
brew install kubectl

# Or download directly
curl -LO "https://dl.k8s.io/release/$(curl -L -s https://dl.k8s.io/release/stable.txt)/bin/darwin/amd64/kubectl"
chmod +x kubectl
sudo mv kubectl /usr/local/bin/
Windows (PowerShell as Administrator):
# Using Chocolatey
choco install kubernetes-cli

# Or using Scoop
scoop install kubectl

# Verify installation
kubectl version --client
Copy kubeconfig from Control Plane
The kubeconfig file contains cluster credentials and connection information. Let's copy it from the control plane node:
# From your local machine, copy the kubeconfig
scp k8sadmin@192.168.30.10:/home/k8sadmin/.kube/config ~/.kube/config

# Or if you don't have a .kube directory yet:
mkdir -p ~/.kube
scp k8sadmin@192.168.30.10:/home/k8sadmin/.kube/config ~/.kube/config

# Set proper permissions
chmod 600 ~/.kube/config
Note: Replace 192.168.30.10 with your control plane node's IP address, and k8sadmin with your SSH username.
Update the Server Address
The kubeconfig copied from the control plane likely references 127.0.0.1 or localhost. We need to update it to use the control plane's actual IP:
# View current config
kubectl config view

# Update the server address
kubectl config set-cluster kubernetes --server=https://192.168.30.10:6443

# Or edit manually
nano ~/.kube/config
# Find "server: https://127.0.0.1:6443" and change to your CP node IP
Test the Connection
# Check cluster info
kubectl cluster-info

# View nodes
kubectl get nodes

# Check system pods
kubectl get pods -A
You should see output showing your cluster nodes and all the system components running (calico, longhorn, traefik, metallb, etc.).
Success! You can now manage your cluster from your local machine without SSH'ing into the control plane. All subsequent kubectl commands in this guide can be run from your workstation.
Multiple Clusters (Optional)
If you manage multiple Kubernetes clusters, you can switch between them:
# View available contexts
kubectl config get-contexts

# Switch to a different cluster
kubectl config use-context <context-name>

# Rename the current context for clarity
kubectl config rename-context kubernetes homelab
Create a Namespace
Keep things organized by using a dedicated namespace:
kubectl create namespace ghost
Set it as default for this session:
kubectl config set-context --current --namespace=ghost
Deploy MySQL Database
Note: The MySQL StatefulSet uses volumeClaimTemplates which automatically creates PersistentVolumeClaims. You don't need to create a separate PVC manually.
Create MySQL Secret
Store the database credentials securely:
kubectl create secret generic mysql-secret \
  --from-literal=mysql-root-password=changeme123 \
  --from-literal=mysql-database=ghost \
  --from-literal=mysql-user=ghost \
  --from-literal=mysql-password=ghostpass123 \
  -n ghost
Production Note: In production, use stronger passwords and consider using a secrets management solution like Sealed Secrets or External Secrets Operator. For a homelab, these passwords are acceptable.
Deploy MySQL
Create the MySQL Service. Save this to a file named mysql-service.yaml:
apiVersion: v1
kind: Service
metadata:
  name: mysql
  namespace: ghost
spec:
  clusterIP: None
  selector:
    app: mysql
  ports:
    - name: mysql
      port: 3306
      targetPort: 3306
Apply it:
kubectl apply -f mysql-service.yaml
Create the MySQL StatefulSet file via nano, etc and call it mysql-statefulset.yaml:
apiVersion: apps/v1
kind: StatefulSet
metadata:
  name: mysql
  namespace: ghost
spec:
  serviceName: mysql
  replicas: 1
  selector:
    matchLabels:
      app: mysql
  template:
    metadata:
      labels:
        app: mysql
    spec:
      containers:
        - name: mysql
          image: mysql:8.0
          ports:
            - containerPort: 3306
          env:
            - name: MYSQL_ROOT_PASSWORD
              valueFrom:
                secretKeyRef:
                  name: mysql-secret
                  key: mysql-root-password
            - name: MYSQL_DATABASE
              valueFrom:
                secretKeyRef:
                  name: mysql-secret
                  key: mysql-database
            - name: MYSQL_USER
              valueFrom:
                secretKeyRef:
                  name: mysql-secret
                  key: mysql-user
            - name: MYSQL_PASSWORD
              valueFrom:
                secretKeyRef:
                  name: mysql-secret
                  key: mysql-password
          readinessProbe:
            exec:
              command:
                - sh
                - -c
                - mysqladmin ping -h 127.0.0.1 -u root -p"$MYSQL_ROOT_PASSWORD"
            initialDelaySeconds: 30
            periodSeconds: 10
            timeoutSeconds: 5
            failureThreshold: 6
            successThreshold: 1
          livenessProbe:
            exec:
              command:
                - sh
                - -c
                - mysqladmin ping -h 127.0.0.1 -u root -p"$MYSQL_ROOT_PASSWORD"
            initialDelaySeconds: 60
            periodSeconds: 10
            timeoutSeconds: 5
            failureThreshold: 3
            successThreshold: 1
          resources:
            requests:
              cpu: "250m"
              memory: "512Mi"
            limits:
              cpu: "500m"
              memory: "1Gi"
          volumeMounts:
            - name: mysql-data
              mountPath: /var/lib/mysql
  volumeClaimTemplates:
    - metadata:
        name: mysql-data
      spec:
        accessModes:
          - ReadWriteOnce
        storageClassName: longhorn
        resources:
          requests:
            storage: 10Gi
Apply the StatefulSet:
kubectl apply -f mysql-statefulset.yaml
Verify MySQL is running:
kubectl get pods -n ghost
kubectl logs -n ghost mysql-0
Volume Provisioning: If the pod is stuck in Pending state with events showing "volume is not ready for workloads", this is normal during initial Longhorn volume provisioning. Longhorn needs time to create and replicate the volume across your nodes (typically 30-60 seconds). Check the status with:
# Check PVC status
kubectl get pvc -n ghost

# Check Longhorn volume status
kubectl get volumes -n longhorn-system
The PVC should eventually show STATUS: Bound. If it stays in Pending for more than 2 minutes, check that:
- Longhorn pods are running:
kubectl get pods -n longhorn-system - You have enough disk space on worker nodes
- At least one node has available storage
Wait until you see ready for connections in the logs.
Deploy Ghost Application
Create Ghost PVC
Save this to a file named ghost-pvc.yaml:
apiVersion: v1
kind: PersistentVolumeClaim
metadata:
  name: ghost-pvc
  namespace: ghost
spec:
  accessModes:
    - ReadWriteOnce
  storageClassName: longhorn
  resources:
    requests:
      storage: 5Gi
Apply it:
kubectl apply -f ghost-pvc.yaml
Create Ghost ConfigMap
Save this to a file named ghost-config.yaml:
apiVersion: v1
kind: ConfigMap
metadata:
  name: ghost-config
  namespace: ghost
data:
  url: http://blog.k8s.home
Apply it:
kubectl apply -f ghost-config.yaml
Deploy Ghost
Save this to a file named ghost-deployment.yaml:
apiVersion: apps/v1
kind: Deployment
metadata:
  name: ghost
  namespace: ghost
spec:
  replicas: 1
  selector:
    matchLabels:
      app: ghost
  template:
    metadata:
      labels:
        app: ghost
    spec:
      containers:
      - name: ghost
        image: ghost:5-alpine
        env:
        - name: url
          valueFrom:
            configMapKeyRef:
              name: ghost-config
              key: url
        - name: database__client
          value: mysql
        - name: database__connection__host
          value: mysql
        - name: database__connection__user
          valueFrom:
            secretKeyRef:
              name: mysql-secret
              key: mysql-user
        - name: database__connection__password
          valueFrom:
            secretKeyRef:
              name: mysql-secret
              key: mysql-password
        - name: database__connection__database
          valueFrom:
            secretKeyRef:
              name: mysql-secret
              key: mysql-database
        ports:
        - containerPort: 2368
          name: http
        volumeMounts:
        - name: ghost-storage
          mountPath: /var/lib/ghost/content
        resources:
          requests:
            memory: 256Mi
            cpu: 100m
          limits:
            memory: 512Mi
            cpu: 500m
        readinessProbe:
          httpGet:
            path: /
            port: 2368
          initialDelaySeconds: 30
          periodSeconds: 10
        livenessProbe:
          httpGet:
            path: /
            port: 2368
          initialDelaySeconds: 60
          periodSeconds: 30
      volumes:
      - name: ghost-storage
        persistentVolumeClaim:
          claimName: ghost-pvc
Apply it:
kubectl apply -f ghost-deployment.yaml
Create Ghost Service
Save this to a file named ghost-service.yaml:
apiVersion: v1
kind: Service
metadata:
  name: ghost
  namespace: ghost
spec:
  selector:
    app: ghost
  ports:
    - port: 80
      targetPort: 2368
  type: ClusterIP
Apply it:
kubectl apply -f ghost-service.yaml
Verify Ghost is running:
kubectl get pods -n ghost
kubectl logs -n ghost -l app=ghost
Wait for Ghost to initialize (it may take a minute or two on first startup).
Create Gateway API HTTPRoute
Route traffic from blog.k8s.home to the Ghost service. Save this to a file named ghost-route.yaml:
apiVersion: gateway.networking.k8s.io/v1
kind: HTTPRoute
metadata:
  name: ghost
  namespace: ghost
spec:
  parentRefs:
  - name: main-gateway
    namespace: traefik
  hostnames:
  - blog.k8s.home
  rules:
  - matches:
    - path:
        type: PathPrefix
        value: /
    backendRefs:
    - name: ghost
      port: 80
Apply it:
kubectl apply -f ghost-route.yaml
Verify the route is accepted:
kubectl get httproute -n ghost
You should see HOSTNAMES: blog.k8s.home and the route should be accepted by the gateway.
Add DNS Record
Add a DNS record for the Ghost blog:
UniFi Users
- Go to Settings → Policy Table → Create New Policy → DNS
- Add a new Host (A) record:
- Domain Name:
blog.k8s.home - IP Address:
192.168.30.200(your Traefik LoadBalancer IP)
- Domain Name:
- Click Add
Pi-hole Users
If using Pi-hole, the wildcard *.k8s.home record already covers this. No additional configuration needed!
Test DNS Resolution
nslookup blog.k8s.home
Should return 192.168.30.200.
Access Your Ghost Blog
Open a browser and navigate to:
http://blog.k8s.home
You should see the Ghost welcome page!
Complete Ghost Setup
- Navigate to
http://blog.k8s.home/ghost(the admin panel) - Click Create your account
- Fill in your details:
- Site title: Your Blog Name
- Full name: Your Name
- Email: your@email.com
- Password: (choose a strong password)
- Click Create account & start publishing →
🎉 You now have a fully functional Ghost blog running on Kubernetes with persistent storage!
Verify Persistent Storage
Let's confirm that data persists across pod restarts.
PVC Names: The MySQL StatefulSet automatically created a PVC named mysql-data-mysql-0 (following the pattern: volumeClaimTemplate-name + "-" + statefulset-name + "-" + ordinal). The Ghost application uses ghost-pvc which we created manually. You can view both with: kubectl get pvc -n ghost
Create a Test Post
- In the Ghost admin panel (
http://blog.k8s.home/ghost), create a new post - Add some content and publish it
- View it on your blog
Delete the Ghost Pod
kubectl delete pod -n ghost -l app=ghost
Kubernetes will automatically recreate the pod (thanks to the Deployment).
Verify Data Persists
- Wait for the new pod to be ready:
kubectl get pods -n ghost - Refresh your blog in the browser
- Your test post should still be there!
This confirms:
- Longhorn is providing persistent storage
- Data survives pod restarts
- MySQL and Ghost content are both persistent
Understanding What We Built
Storage Layer (Longhorn)
- mysql-data-mysql-0 (from StatefulSet
volumeClaimTemplates): 10GB for MySQL database files - ghost-pvc: 5GB for Ghost content (posts, themes, images)
- Both use Longhorn's
ReadWriteOnceaccess mode - Data is replicated across worker nodes (Longhorn default: 3 replicas)
Application Layer
- MySQL StatefulSet: Provides stable network identity and persistent storage
- Ghost Deployment: Runs the web application
- Secrets: Store sensitive database credentials
- ConfigMap: Store non-sensitive configuration (blog URL)
Networking Layer
- ClusterIP Services: Internal cluster communication (Ghost ↔ MySQL)
- HTTPRoute: External access via Gateway API
- MetalLB LoadBalancer: Provides stable external IP for Traefik
- Local DNS: Resolves
blog.k8s.hometo Traefik IP
Check Resource Usage
See what resources the Ghost stack is consuming:
# View pods and their status
kubectl get pods -n ghost

# Check resource usage
kubectl top pods -n ghost

# Check PVC status
kubectl get pvc -n ghost

# View Longhorn volumes in the UI
# Navigate to http://<node-ip>:30080 (Longhorn UI)
Troubleshooting
Ghost Pod Won't Start
Check the logs:
kubectl logs -n ghost -l app=ghost
Common issues:
- MySQL not ready yet (wait a minute and check again)
- Database connection error (verify MySQL is running:
kubectl get pods -n ghost) - PVC not bound (check:
kubectl get pvc -n ghost)
Can't Access http://blog.k8s.home
-
Check DNS resolution:
bash code-highlightnslookup blog.k8s.home # Should return 192.168.30.200 -
Check HTTPRoute status:
bash code-highlightkubectl get httproute -n ghost # Should show HOSTNAMES: blog.k8s.home -
Check Ghost service:
bash code-highlightkubectl get svc -n ghost ghost # Should have CLUSTER-IP and port 80 -
Test from within the cluster:
bash code-highlightkubectl run -it --rm debug --image=curlimages/curl --restart=Never -- \ curl http://ghost.ghost.svc.cluster.local -
Check Traefik logs:
bash code-highlightkubectl logs -n traefik -l app.kubernetes.io/name=traefik --tail=50
MySQL Connection Issues
Check if MySQL is ready:
kubectl logs -n ghost mysql-0 | grep "ready for connections"
Test MySQL connectivity from Ghost pod:
kubectl exec -n ghost -it deployment/ghost -- sh
# Inside the pod:
apk add mysql-client
MYSQL_PASSWORD='<your-mysql-password>'
mysql -h mysql -u ghost -p"$MYSQL_PASSWORD" ghost
PVC Not Binding
Check Longhorn status:
kubectl get pvc -n ghost
kubectl describe pvc mysql-data-mysql-0 -n ghost
If PVC is stuck in Pending, check Longhorn:
kubectl get pods -n longhorn-system
Cleanup (Optional)
If you want to remove the Ghost deployment:
# Delete all Ghost resources
kubectl delete namespace ghost

# This will also delete the PVCs and trigger Longhorn to delete the volumes
Data Loss Warning: Deleting the namespace will delete all data, including your blog posts. Only do this if you're sure you want to start over.
What's Next
Now that you have a working application deployment, consider:
- Add HTTPS/TLS with cert-manager (automatic Let's Encrypt certificates)
- Set up backups for your Longhorn volumes
- Deploy more applications using the same patterns
- Add monitoring with Prometheus and Grafana
- Implement GitOps with Argo CD for declarative deployments
- Add authentication to protect admin interfaces
Key Takeaways
✅ Persistent Storage Works: Longhorn provides reliable persistent volumes for stateful apps
✅ Gateway API is Production-Ready: Clean, declarative routing for your applications
✅ DNS Integration: No more port numbers or hosts file edits
✅ Multi-Container Deployments: Database + application working together seamlessly
✅ Resource Management: Kubernetes handles pod restarts and maintains desired state
✅ Scalable Pattern: This same pattern works for WordPress, Nextcloud, Gitea, and countless other apps
➡️ Next: Kubernetes on Proxmox – HTTPS with cert-manager
Real-World Platform Engineering in Your Inbox
One email a week. Deep dives on Kubernetes, homelab builds, platform tooling, and building in public from someone who does this for a living.
No fluff, no sponsored blasts. Unsubscribe any time.
Reach Engineers Who Build Platforms
My readers are Staff Engineers, Platform Engineers, and DevOps/SRE leads — the people who evaluate, buy, and recommend infrastructure tooling at their companies.
- → Sponsored posts, newsletter placements, and resource page features available
- → Audience: platform engineering, Kubernetes, GitOps, and homelab builders
- → Formats tailored to technical audiences — no generic ad copy
📚 Part of: Kubernetes Homelab
Related Posts
Kubernetes on Proxmox: Persistent Storage with Longhorn
Installing Longhorn to provide persistent volumes for workloads running on a Kubernetes cluster hosted on Proxmox.
Kubernetes on Proxmox: Future-Proof Ingress with Traefik + Gateway API
Install Traefik as a Gateway API controller and expose apps using Gateway + HTTPRoute (a modern replacement path for Ingress).
Kubernetes on Proxmox: GitOps Automation with ArgoCD
Implement GitOps workflows for automated, declarative deployments using ArgoCD - manage your entire homelab from Git