Planning Hardware for a Production-Like Kubernetes Homelab
How to choose the right hardware for running Kubernetes at home: mini PCs, memory requirements, storage considerations, and why I chose what I did.
📚 Part of: Kubernetes Homelab
Building a Kubernetes homelab that actually teaches you production patterns requires hardware that can handle multiple VMs, networking complexity, and storage I/O without falling over.
This post covers the hardware decisions I made before diving into Proxmox, Kubernetes, and networking — and why cheap mini PCs are often better than old enterprise servers for learning at home.
What You Actually Need for Kubernetes
Before buying anything, I set requirements based on what I wanted to learn, not just what could technically run:
CPU
- Minimum: 4 cores (2 control plane + 2 workers)
- Recommended: 6-8 cores for multiple worker nodes + headroom
- Why: Modern CPUs handle virtualization efficiently; you don't need server-grade Xeons
Memory
- Minimum: 16GB (barely usable for 3 VMs)
- Recommended: 32GB+ for realistic workloads
- Ideal: 64GB if running monitoring, databases, storage layers
- Why: Kubernetes eats RAM. So does Proxmox. So does every pod you deploy.
Storage
- Minimum: 512GB NVMe
- Recommended: 1TB+ NVMe for OS + VMs + storage experiments
- Bonus: Additional drives for Rook/Ceph or Longhorn testing
- Why: ZFS benefits from fast storage, and you'll want space for snapshots
Networking
- Minimum: 1Gbit NIC
- Recommended: 2.5Gbit or dual NICs for VLAN segmentation
- Why: Real networking forces you to learn ingress, load balancing, and firewall rules properly
Why I Chose a Mini PC Over Enterprise Hardware
When I started researching, the common advice was "Buy a used Dell R720 for $200!"
But after running the numbers, I realized:
- Power consumption: Enterprise servers pull 150-300W idle. Mini PCs? 15-30W.
- Noise: Rack servers sound like jet engines. Mini PCs are silent.
- Modern CPUs: N100-class systems are great for entry-level labs, but I wanted more cores and memory headroom for multi-node clusters.
- Cost over time: The electricity alone pays for a new mini PC within a year.
For learning Kubernetes, you don't need 40 cores. You need:
- Enough RAM to run 3-5 VMs
- Fast storage for responsive feedback loops
- Low power draw so you can leave it running 24/7
- Quiet operation so it can sit on your desk
My Hardware Choice
For this homelab, I wanted something that felt production-capable without the downsides of enterprise gear — noise, heat, power draw, and aging hardware.
Mini PC
I went with a Ryzen-based mini PC that hits a really solid sweet spot for specs vs cost.
Key specs:
- CPU: AMD Ryzen 7 (8 cores / 16 threads)
- Memory: 32GB RAM (user-upgradeable)
- Storage (included): NVMe SSD
- Expansion: Additional NVMe slot
- Networking: 2.5Gb Ethernet
- Form factor: Small, quiet, low-power
The main reason I chose this model was the balance it struck:
- A modern Ryzen 7 CPU with plenty of cores for virtualization
- 32GB of RAM out of the box, which is realistically the minimum for a serious Kubernetes lab
- Dual NVMe support, which is uncommon at this price point
- Still one of the cheaper mini PCs with comparable hardware
At the time I bought it, anything else with similar CPU and memory was either:
- More expensive
- Locked down on upgrades
- Or based on significantly weaker CPUs
This box gives me enough headroom to comfortably run:
- Proxmox
- Multiple Kubernetes control plane and worker VMs
- Monitoring stacks (Prometheus, Grafana)
- Storage layers without immediately running into resource pressure
Additional Storage Upgrade
In addition to the included NVMe drive, I added a second 1TB NVMe M.2 2280 SSD.
The specific brand isn’t critical here — any decent 1TB NVMe M.2 2280 drive will work — but the reason for adding it is important.
I added the second drive so I could:
- Run ZFS mirror (RAID1) at the Proxmox layer
- Tolerate a single-disk failure without taking the entire lab down
- Make disk failures easy to recover from instead of catastrophic
With two NVMe drives mirrored:
- The lab keeps running if a drive fails
- The failed disk can be replaced
- ZFS resilvers automatically without rebuilding everything
This is exactly the kind of real operational failure scenario that’s valuable to experience in a homelab:
- Real failure
- Real recovery
- No data loss
- Minimal downtime
It also makes snapshots, VM cloning, and storage experimentation far less stressful.
Why This Setup Works Well for Kubernetes
This hardware gives me:
- Enough CPU cores to oversubscribe VMs realistically
- Enough RAM to avoid artificial constraints
- Fast, redundant storage for ZFS and Kubernetes workloads
- Low enough power draw to leave running 24/7
Most importantly, it lets me practice production-like patterns:
- Multiple nodes
- Storage redundancy
- Failure recovery
- Resource contention
Without dealing with:
- Enterprise noise levels
- 10-year-old hardware
- Or massive power bills
Hardware Summary
Here’s the final setup I landed on:
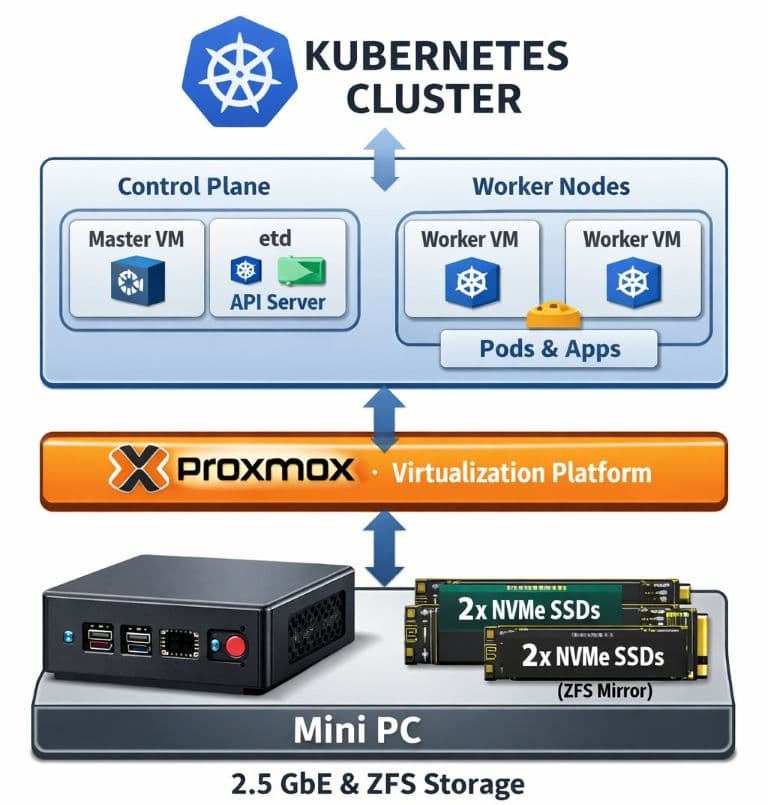
| Component | Choice | Reason |
|---|---|---|
| Mini PC | Ryzen 7-based mini PC | Best price/performance for cores + RAM |
| RAM | 32GB | Minimum for comfortable Kubernetes learning |
| Storage | 2× 1TB NVMe (ZFS mirror) | Redundancy + easy recovery |
| Networking | 2.5Gb Ethernet | VLANs and higher throughput |
| Power | ~20–30W idle | Cheap to run 24/7 |
Alternative Options (If You're Shopping)
Biggest thing is buy what you can afford and keep in mind trying to get something that will work long term.
If you're looking for similar hardware, here's what matters:
Budget Tier (~$200-300)
- Intel N100 or N95 mini PCs
- 16GB RAM (expandable to 32GB preferred)
- 256GB NVMe
- Good for: Learning Kubernetes basics
- You’ll outgrow it when: You add monitoring + storage layers
Mid-Range (~$400-600)
- Intel i5/i7 12th-gen or AMD Ryzen 5000-series
- 32GB+ RAM
- 512GB+ NVMe
- 2.5Gbit NIC or dual NICs
- Good for: Full homelab with monitoring, storage layers, multiple projects
Enthusiast (~$800+)
- Intel i7/i9 or Ryzen 7/9
- 64GB+ RAM
- 1TB+ NVMe + additional SSDs
- 10Gbit NIC or multiple 2.5Gbit ports
- Good for: Running prod-like workloads, CI/CD, multiple clusters
Storage Considerations
This is where many guides get it wrong. You don't need a NAS or SAN to learn Kubernetes storage.
Here's what I recommend:
For Learning
- Single NVMe: Totally fine. Use Proxmox ZFS for snapshots.
- Local storage: Kubernetes can use local-path-provisioner or OpenEBS for simple cases.
- What you'll learn: PVCs, storage classes, ephemeral storage
For Advanced Learning
- Second drive: Add a SATA SSD or second NVMe
- Storage layers: Practice Rook/Ceph, Longhorn, or MinIO
- What you'll learn: Distributed storage, replication, real-world storage ops
Don't overbuild: You'll learn more from constrained resources than from infinite storage.
Networking Hardware
You'll also need networking gear that supports VLANs (covered in the next post about Proxmox and networking).
Minimum:
- Managed switch with VLAN support (even a cheap TP-Link or Netgear)
- Router that can handle inter-VLAN routing
Recommended:
- UniFi switch (USW-Lite-8-PoE or similar)
- Firewall appliance or pfSense/OPNsense box. I use UniFi Cloud Gateway myself.
- Why: Proper VLAN segmentation teaches you production networking patterns
I covered my UniFi networking setup in detail in Why I Switched to UniFi for My Homelab, which explains the VLAN architecture and what it enables for Kubernetes.
Power and Physical Setup
Power Consumption Math
- Mini PC: ~20W average × 24h × 365 days × $0.12/kWh = $21/year
- Old server: ~200W average × 24h × 365 days × $0.12/kWh = $210/year
That $190 difference buys better hardware every single year.
Physical Placement
- Desk setup: Most mini PCs are silent enough to sit next to your monitor
- Rack setup: Some mini PCs have rack ears or 1U mounting options
- Cooling: Ensure airflow; don't stack in enclosed spaces
What You Don't Need
Let me save you some money:
❌ ECC RAM — Helpful for prod, unnecessary for learning
❌ Redundant power supplies — This is a homelab, not a datacenter
❌ 10Gbit networking — 1Gbit is fine, 2.5Gbit is plenty
❌ Rack-mount servers — Unless noise/power aren't concerns
❌ Enterprise SSDs — Consumer NVMe is fast enough
Cost Breakdown
Here's what I spent (You don't have to get the same things):
Affiliate Disclosure: Some of the links below are Amazon affiliate links. If you purchase through these links, I may earn a small commission at no additional cost to you. This helps support the blog and allows me to continue creating content like this. I only recommend products I actually use in my homelab.
Core Hardware
Sometimes you can get this Mini PC on sale, I originally bought it for $375 during Black Friday. Prices are also going up I believe due to the RAM situation.
| Item | Cost | Notes |
|---|---|---|
| Mini PC (base) | $529.99 | GMKtec M5 Plus |
| RAM upgrade | N/A | 32GB included |
| Additional storage | $136.99 | BIWIN Black Opal 1TB |
| Hardware Subtotal | $596.98 |
Networking (Optional but Recommended)
| Item | Cost | Notes |
|---|---|---|
| Network switch | $109.00 | UniFi Lite 8 PoE |
| Router/Firewall | $199.00 | UniFi Cloud Gateway |
| Networking Subtotal | $308.00 | Enables VLANs and production-like networking |
Grand Total: $904.98
The networking gear is optional if you already have a managed switch and router that supports VLANs. But for learning production Kubernetes patterns, proper network segmentation is worth the investment.
Compare this to:
- Enterprise server: $200 (used) + $200/year power = $400 first year
- Cloud equivalent: $50-100/month for similar resources = $600-1200/year
The mini PC pays for itself immediately and keeps paying. I did opt for a bit higher end mini PC but I didn't want to run out of resources.
Mistakes I Almost Made
Before settling on this hardware, I almost:
- Bought a used R720 — Realized power costs and noise weren't worth it
- Cheaped out on RAM — 16GB is technically usable but frustrating
- Skipped the managed switch — VLANs are essential for realistic networking
- Went with only 256GB storage — Snapshots and experiments eat space fast
If you're on the fence about any of these, spend the extra money upfront. You'll save time and frustration.
What's Next
Now that the hardware is sorted, the next post covers:
- Installing Proxmox VE
- Configuring ZFS storage
- Setting up VLAN networking with UniFi
- VM creation for Kubernetes nodes
- Firewall gotchas that will waste hours if you miss them
See below for the Part 2 in this series on setting up the mini-pc with Proxmox.
Final Thoughts
You don't need enterprise hardware to learn Kubernetes properly. You need:
✅ Enough resources to run multiple VMs
✅ Fast storage for quick feedback loops
✅ Networking gear that forces you to learn production patterns
✅ Low power draw so you can leave it running
The hardware is the foundation. Get it right, and everything else becomes easier.
In the next post, we'll install Proxmox and configure networking that actually resembles what you'd see in a real datacenter — VLANs, firewall rules, and all.
Real-World Platform Engineering in Your Inbox
One email a week. Deep dives on Kubernetes, homelab builds, platform tooling, and building in public from someone who does this for a living.
No fluff, no sponsored blasts. Unsubscribe any time.
Reach Engineers Who Build Platforms
My readers are Staff Engineers, Platform Engineers, and DevOps/SRE leads — the people who evaluate, buy, and recommend infrastructure tooling at their companies.
- → Sponsored posts, newsletter placements, and resource page features available
- → Audience: platform engineering, Kubernetes, GitOps, and homelab builders
- → Formats tailored to technical audiences — no generic ad copy
📚 Part of: Kubernetes Homelab
Related Posts
Kubernetes on Proxmox: GitOps Automation with ArgoCD
Implement GitOps workflows for automated, declarative deployments using ArgoCD - manage your entire homelab from Git
Kubernetes on Proxmox: Secure Your Apps with HTTPS and cert-manager
Add automatic HTTPS with Let's Encrypt certificates using cert-manager, securing your Kubernetes applications with trusted SSL/TLS.
Kubernetes on Proxmox: Deploying Your First Real Application
Deploy a complete stateful application using persistent storage, ingress routing, and DNS in your homelab Kubernetes cluster.