Proxmox for a Realistic Kubernetes Homelab (VLANs, Networking, and Gotchas)
How I set up Proxmox and UniFi networking to support a production-like Kubernetes homelab, including VLANs, firewall pitfalls, and lessons learned.
📚 Part of: Kubernetes Homelab
If you want to run Kubernetes at home in a way that actually resembles production, Proxmox is an excellent foundation.
This post covers everything that happened before Kubernetes even entered the picture: Proxmox installation, VLAN design, UniFi switch configuration, firewall pitfalls, and the mistakes that caused hours of head-scratching.
This is Part 2 of a multi-part series where I build a production-like Kubernetes homelab on Proxmox.
Why Proxmox?
I wanted a setup that:
- Supports multiple Kubernetes nodes
- Uses real networking, not host-only shortcuts
- Forces me to debug routing, ingress, and firewall rules
- Feels close to what you’d see in enterprise environments
Proxmox checks all of those boxes:
- Bare-metal hypervisor
- Strong, explicit networking model
- ZFS built in
- Great UI and CLI
Most importantly, Proxmox doesn’t hide complexity, which is exactly what you want when learning Kubernetes seriously.
Hardware Overview
- Mini PC running Proxmox VE
- NVMe storage for VM disks
- ZFS configured during install
- Additional ZFS pool created for Kubernetes workloads
All Kubernetes nodes run as VMs, not LXC containers.
This is intentional. LXC skips too many layers that matter for Kubernetes internals and certification-style learning (CKA/CKAD).
For more information on the Hardware decisions see Part 1: Planning & Hardware
Important: Backup Your Original OS Before Proceeding
Installing Proxmox will completely wipe your mini PC's existing operating system (typically Windows). Most mini PCs do not come with recovery media or restoration USB drives.
Before you begin:
- Create a full disk backup using software like Macrium Reflect or Clonezilla if you want to preserve the original OS
- Or create recovery media using Windows' built-in recovery drive tool (Settings → Update & Security → Recovery → Create a recovery drive)
- Ensure you have any necessary Windows license keys documented
- Back up any important data from the existing system
Once Proxmox is installed, your original OS will be gone and cannot be easily recovered without a backup.
Adding Additional Storage (Optional but Recommended)
Before installing Proxmox, I added a second SSD to the mini PC for additional storage capacity and to use a ZFS mirror (RAID1) for redundancy. While not strictly required, this will make hardware failures easier to recover from.
Why Add a Second Drive?
Having two drives allows you to configure ZFS in mirror mode (also called RAID1), which provides several critical benefits:
Data Redundancy
- If one drive fails, your VMs and data remain intact
- No downtime from a single disk failure
- Critical for a homelab where you're running persistent workloads
ZFS Mirror Performance
- Reads are faster (ZFS can read from both drives)
- Writes are only as fast as the slower drive, but redundancy is worth it
- Better than no redundancy at all
Homelab Reality Check
- Consumer SSDs fail more often than enterprise drives
- Rebuilding a Kubernetes cluster from scratch is time-consuming
- Persistent volumes (databases, monitoring data) need protection
Without a second drive, you're running a single point of failure. For a learning environment where you're testing production-like scenarios, this defeats the purpose.
ZFS mirror strikes the right balance between cost, performance, and protection for a homelab.
Opening the Mini PC
Tools Needed:
- Small flathead screwdriver (or your fingernail)
- Phillips head screwdriver
Safety:
- Power off the mini PC completely
- Unplug all cables
- Work on a static-free surface
Steps:
-
Remove the top cover
- Use a small flathead screwdriver or your fingernail to carefully pop off the top cover
- Start at one corner and work your way around
-
Unscrew the fan assembly
- Locate the screws on each side of the mini PC (4 total)
- Remove all screws to free the fan assembly
Be careful when working on this, you need to gently disconnect this wire to get the fan assembly off.
-
Remove the fan
- Use a small flathead screwdriver to gently pop out the fan bezel
- Carefully disconnect the fan power cable from the motherboard
- Set the fan assembly aside safely
Installing the M.2 SSD
With the fan removed, you now have clear access to the motherboard.
Steps:
- Locate the M.2 slot
- Most mini PCs have 2 M.2 slots
- One is already occupied by the primary drive
- Find the second empty M.2 slot on the motherboard
-
Insert the SSD
- Align the notch on the SSD with the key in the M.2 slot
- Insert the drive at a 30-degree angle
- Gently but firmly press the drive into the slot until fully seated
- If it doesn't slide in easily, do not force it - check the alignment again
-
Secure the drive
- Gently press the drive down flat against the motherboard
- Locate the securing screw hole at the end of the drive
- Use the small screw provided on the board (or included with the SSD)
- Screw it down snugly, but don't overtighten
-
Reassemble
- Reconnect the fan power cable to the motherboard
- Snap the fan bezel back into place
- Replace the 4 screws on each side of the mini PC
- Snap the top cover back on
Verifying the Drive
Now we should be ready for the next part of installing Proxmox. If you want to validate the drive is being seen before the install you can check the Bios of the Mini PC and validate it shows up or just validate it during the Proxmox install.
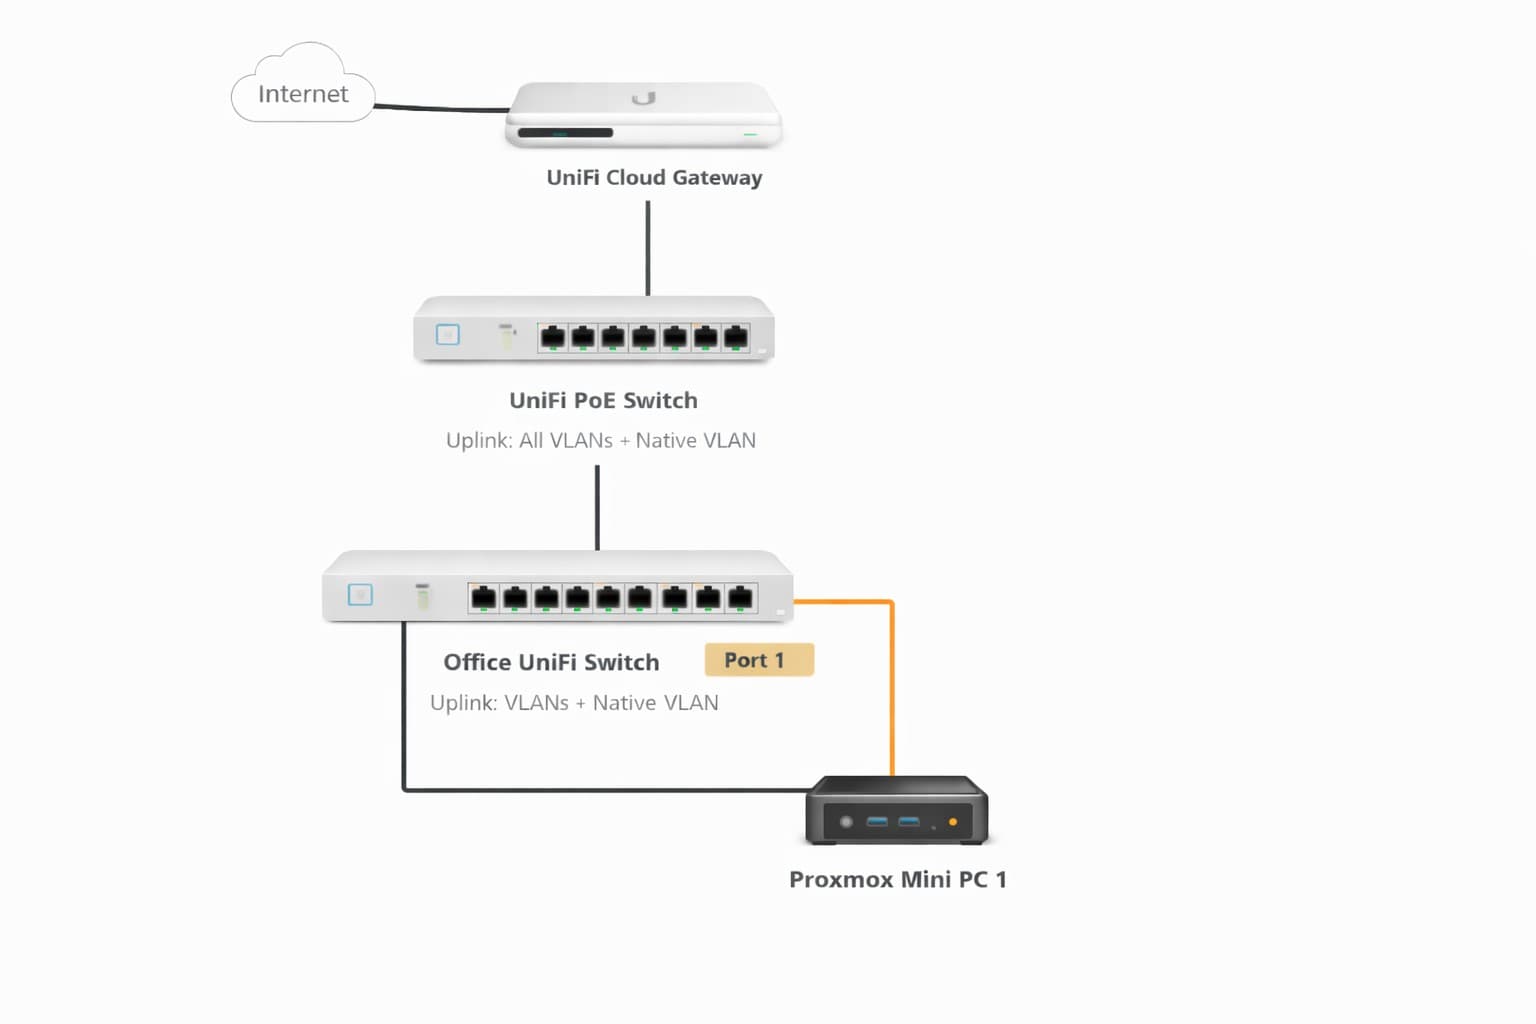
Networking Design (This Is the Critical Part)
Before installing Proxmox, you need to plan your network architecture. This is where most homelabs fail - trying to retrofit networking after the fact leads to confusion and technical debt.
VLAN Strategy
I created a dedicated homelab/Kubernetes VLAN:
- VLAN ID:
30 - Subnet:
192.168.30.0/24 - Gateway / DHCP: UniFi router
Why a separate VLAN?
- Mirrors real production environments
- Forces proper routing and firewall thinking
- Prevents "everything works because it's flat" setups
- Makes ingress and service exposure meaningful
All Kubernetes nodes live only on this VLAN.
Creating the VLAN in UniFi
Before configuring switch ports, you need to create the VLAN in your UniFi Network application.
Steps:
-
Open UniFi Network Application
- Accessed via https://unifi.ui.com
-
Navigate to Networks
- Once logged in and clicked on your site go to Settings -> Networks
-
Create New Network
- From here click
New Virtual Networkyou can use the information in the next step or modify it.
- From here click
-
Configure VLAN Settings
- Name:
Homelab(or your preferred name) - I unselected
Auto-Scale Networkthen modified the IPv4 info. - IPv4 Address:
192.168.30.1Netmask:24 - VLAN ID:
30 - Gateway/Subnet:
192.168.30.1/24 - DHCP: Enable (optional but recommended)
- See screenshot for full configuration I used
You will notice I start my DHCP range at 12, that leaves me 2-11 to use for host addresses or other static IP's I might need.
- Name:
-
Apply Changes
- Then click
Create
- Then click
Once the VLAN is created, you can proceed to configure your switch ports.
UniFi Switch Configuration (What Actually Broke Things)
With your VLAN strategy planned, you need to configure your physical switches before installing Proxmox.
Mistake #1: Using an Unmanaged Switch
Initially, Proxmox was connected through an unmanaged switch.
This caused subtle but brutal issues:
- VLAN tags were stripped
- Devices appeared on the wrong subnet
- Proxmox UI became intermittently unreachable
- Kubernetes nodes received unexpected IPs
Unmanaged switches and VLANs do not mix.
While you don't necessarily need this, it will make things cleaner and more realistic long term with the networking.
Fix: replace it with a managed UniFi switch.
Trunk vs Access Ports (Very Important)
Once the managed switch was in place, port configuration mattered a lot.
Uplink Port (Main Switch → Office Switch)
I have a switch in my office (where the mini pc connects) from my main Unifi switch so I had to setup this switch uplink as a trunk.
Configured as a trunk:
- Native (untagged): default LAN
- Tagged: VLAN 30 (Homelab/Kubernetes)
Proxmox Host Port
This is the port configuration on the Office switch where the mini pc will connect.
Configured as an access port:
- Tagged VLAN:
30 - No VLAN tagging inside Proxmox VM NICs
This is a common mistake: tagging both at the switch and inside Proxmox will break connectivity in confusing ways.
Installing Proxmox VE
Downloading the Proxmox ISO
First step is to download the latest ISO from Here. As of writing this version 9.1 is latest.
Creating a Bootable USB Drive
There is documentation on Proxmox's website Here with the overall process for doing this per OS.
We are on Windows so we will be using Etcher like the docs recommend. So once installed it is very easy to make a bootable USB.
After installing and opening Etcher just select your ISO for the Flash from file option and for the Select Target select your USB drive then click Flash!.
BIOS/UEFI Configuration
Before installing Proxmox, you need to ensure virtualization is enabled in your BIOS/UEFI settings.
Required Settings:
-
Access BIOS/UEFI
- Insert the bootable USB drive
- Power on the mini PC
- Press the BIOS key during boot (usually F2, F10, F12, or Del - check your mini PC's manual)
-
Enable Virtualization Technology
- Look for settings named:
- Intel VT-x (Intel processors)
- AMD-V or SVM Mode (AMD processors)
- These are typically found under:
- Advanced → CPU Configuration
- Advanced → Processor Options
- Security → Virtualization
- Look for settings named:
-
Optional but Recommended: Enable IOMMU
- For Intel: VT-d
- For AMD: AMD-Vi or IOMMU
- Required if you plan to do PCI passthrough later
-
Modify Power Limit Setting
- Ensure in the bios if you have it the power limit setting is set to Performance.
-
Set Boot Order
- Move USB drive to the top of the boot priority list
- Save and exit
Note: For the mini PC I used, virtualization options were already enabled by default. Many modern mini PCs come with these enabled, but it's worth verifying.
If virtualization isn't enabled, Proxmox will install but VMs won't start properly - you'll see errors about hardware virtualization not being available.
Running the Proxmox Installer
The official installation guide is excellent and covers all scenarios: Proxmox VE Installation
Key points for this setup:
- Accept defaults for most options
- Choose ZFS (RAID1) when selecting the filesystem
- Select both SSDs for the mirror
- Set a strong root password
- Note the hostname you choose (you'll need it later)
In case it isn't clear on the first screen you come to, it will default to installing on just 1 drive; this is where you change the target to ZFS (RAID1) and ensure both drives are showing up and selected as part of the mirror.
Initial Network Configuration
During the Proxmox installation, you'll be asked to configure network settings. For now, accept the defaults with these important exceptions:
Management IP: Accept the DHCP-assigned address or set a static IP in your network range
Gateway: Set this to your router's address on VLAN 30: 192.168.30.1
DNS Server: Use the same as the gateway: 192.168.30.1
Note: You can modify these settings later through the Proxmox web UI if needed. The critical part is ensuring the gateway points to your VLAN 30 router so Proxmox can reach the internet for updates.
Before rebooting: Remove the USB installation media! If you leave it plugged in, the system will try to boot from the USB again instead of your installed Proxmox system.
Final Networking Config
One final part before we can move on to the next step is if you are doing what I have with the custom VLAN we need to modify the networking first.
This Proxmox host is configured to run entirely on a tagged management VLAN (VLAN 30). The host itself, along with any attached VMs, communicates over VLAN 30 using a Linux bridge backed by a VLAN sub-interface.
From the console login using root and whatever password you set then do the following:
nano /etc/network/interfaces
Then you want to set it up to look something like below replacing nic0 with whatever nic you are using. You can validate this by doing ip a to see which link is up.
auto lo
iface lo inet loopback

auto nic0
iface nic0 inet manual

auto nic0.30
iface nic0.30 inet manual
    vlan-raw-device nic0

auto vmbr30
iface vmbr30 inet static
        address 192.168.30.11/24
        gateway 192.168.30.1
        bridge-ports nic0.30
        bridge-stp off
        bridge-fd 0

iface nic1 inet manual

iface nic2 inet manual


source /etc/network/interfaces.d/*
How This Works
nic0is the physical network interface and does not have an IP addressnic0.30is a VLAN sub-interface that tags all traffic with VLAN ID 30vmbr30is a Linux bridge connected tonic0.30- The Proxmox host management IP (192.168.30.11) lives on
vmbr30 - The default gateway (192.168.30.1) is also on VLAN 30
- All management traffic for the Proxmox host is therefore isolated to VLAN 30 and requires the connected switch port to be configured as a trunk allowing VLAN 30
Why Use This Setup
- Keeps Proxmox management traffic isolated
- Avoids untagged/native VLAN dependencies
- Makes it easy to attach VMs directly to the management VLAN
- Scales cleanly by adding additional VLAN bridges (e.g., vmbr20, vmbr40)
Network Flow
Proxmox Host
  └─ vmbr30 (192.168.30.11)
       └─ nic0.30 (VLAN 30 tagged)
            └─ nic0 (physical NIC)
                 └─ UniFi switch (trunk port)
Post-Install Setup
Now that Proxmox is installed, ensure you can access the web UI and SSH to the host using the IP and credentials you configured during installation.
The default username for Proxmox is root - use the password you set during installation.
Access the Proxmox web UI at: https://<your-proxmox-ip>:8006
You should see something like below:
Having Issues? If you run into problems during setup, join our Discord community where you can get help from others building similar homelabs.
Proxmox Firewall (Major Gotcha)
This one deserves special attention.
I enabled the Datacenter-level firewall with no rules.
The result:
- Proxmox UI instantly unreachable
- SSH blocked
- Everything appeared “dead”
Nothing was actually broken — I had just locked myself out.
If This Happens to You
If you've already enabled the Datacenter firewall and locked yourself out, here's how to fix it:
-
Physical Access Required
- You'll need direct console access to the Proxmox host
- Connect a monitor and keyboard, or use IPMI/iLO if available
-
Login via Console
- Boot the Proxmox host
- Login as
rootwith your password
-
Disable the Firewall
- Run:
pve-firewall stop - This immediately stops the firewall and restores access
- Run:
-
Make it Permanent (Optional)
- Edit:
/etc/pve/firewall/cluster.fw - Set:
enable: 0 - Or disable via the web UI once you regain access
- Edit:
-
Regain Web Access
- You should now be able to access the Proxmox web UI again
- SSH should also work
Once you have access back, configure the firewall properly before re-enabling it.
Correct Firewall Approach
The correct way to use Proxmox firewall:
- Leave Datacenter firewall disabled
- Enable firewall at the Node level
- Default policy set to DROP
- Explicitly allow:
- Proxmox UI (8006)
- SSH
- Required VLAN traffic
This gives you realistic security without bricking your host.
What This Setup Enables
After fixing networking and firewall issues, I had:
- Stable Proxmox access on VLAN 30
- Clean separation between home LAN and Kubernetes
- A platform ready for:
- Multi-node Kubernetes
- Ingress testing
- Real routing and firewall behavior
At this point, Proxmox stopped being the problem — which is exactly where you want to be.
Lessons Learned (So Far)
- VLANs expose mistakes early — and that’s a good thing
- Unmanaged switches will silently sabotage you
- Don’t double-tag VLANs (switch or hypervisor, not both)
- Proxmox firewall defaults can lock you out instantly
- If networking is flaky, Kubernetes debugging is impossible
What’s Next
In Part 3, I’ll cover:
- Building a multi-control-plane Kubernetes cluster on Proxmox
- kubeadm installation details
- DNS and hostname pitfalls
- Node roles, taints, and scheduling
If you’re studying for Kubernetes certifications or building a serious homelab, this is where things start to feel real.
Real-World Platform Engineering in Your Inbox
One email a week. Deep dives on Kubernetes, homelab builds, platform tooling, and building in public from someone who does this for a living.
No fluff, no sponsored blasts. Unsubscribe any time.
Reach Engineers Who Build Platforms
My readers are Staff Engineers, Platform Engineers, and DevOps/SRE leads — the people who evaluate, buy, and recommend infrastructure tooling at their companies.
- → Sponsored posts, newsletter placements, and resource page features available
- → Audience: platform engineering, Kubernetes, GitOps, and homelab builders
- → Formats tailored to technical audiences — no generic ad copy
📚 Part of: Kubernetes Homelab
Related Posts
Why I Switched to UniFi for My Homelab (And What It Enabled)
How replacing consumer networking gear with UniFi unlocked VLANs, better visibility, and a production-like foundation for Proxmox and Kubernetes.
Kubernetes on Proxmox: DNS and LoadBalancers with MetalLB
Add real DNS and LoadBalancer services to a homelab Kubernetes cluster using MetalLB and local DNS integration.
Kubernetes on Proxmox: GitOps Automation with ArgoCD
Implement GitOps workflows for automated, declarative deployments using ArgoCD - manage your entire homelab from Git